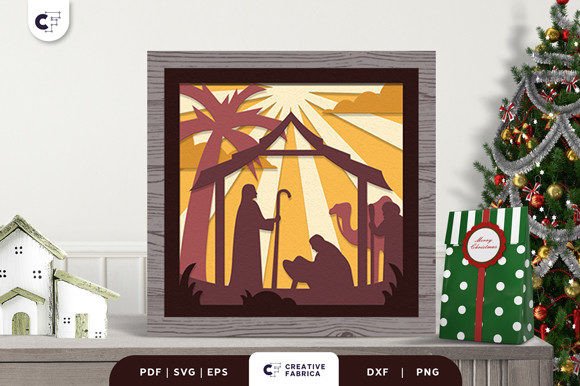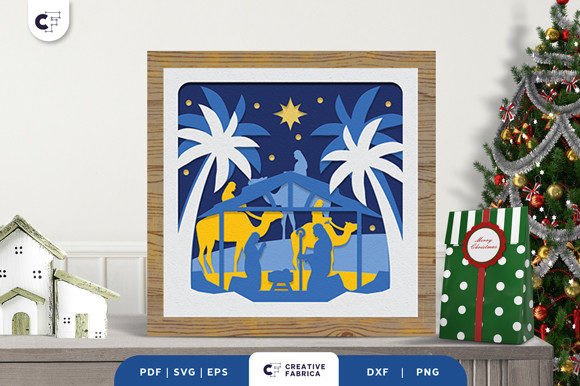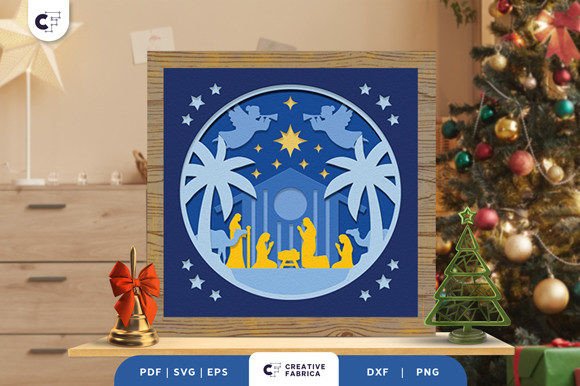
Creating a Radiant Nativity Scene 3D Layered Paper Cut for Your Home
There is a unique quietness that settles over a home when the holidays arrive, a space often filled by the glow of candles or the soft hum of carols. Integrating a Nativity Scene 3D Layered Paper Cut into your decor offers a way to capture that reverence with tangible depth and artistry. Unlike flat prints or mass-produced plastic figurines, these paper arrangements allow you to build a world within a frame. You have the freedom to create arrangements for each element, adjusting dimensions to fit your specific shelf or wall space while crafting a visually pleasing composition that tells a story through shadows and light.
However, diving into the world of layered papercraft without a clear plan can lead to frustration. Many enthusiasts rush into cutting and assembling only to find their final piece lacks the intended dimension or structural integrity. The difference between a hobbyist project and a professional-looking display often lies in the details overlooked during the selection and assembly phases. By understanding common pitfalls, you can ensure your display of angels praying for baby Jesus becomes a radiant centerpiece rather than a dusty experiment.
Choosing the Right Files and Formats
One of the first hurdles creators face is selecting the correct digital format for their skill level and equipment. When you download a design, you will typically receive files in SVG, PDF, EPS, PNG, and DXF formats. A frequent mistake is assuming all these files work equally well for every machine. For instance, using a PNG file for a cutting machine is often ineffective because it is a raster image, not a vector. This can result in jagged edges or the machine failing to recognize cut lines entirely.
If you are using a desktop cutter like a Cricut or Silhouette, the SVG or DXF files are your best friends. They preserve the mathematical paths required for clean cuts. Conversely, if you plan to hand-cut with an X-Acto knife, a high-resolution PDF printed on sturdy stock might offer better visual guidance. Ignoring this distinction can waste expensive cardstock and blunt your blades before you even begin assembly. Always check the file compatibility with your specific tool before committing to a cut.
The Critical Role of Paper Weight and Texture
Perhaps the most impactful variable in creating a successful 3D scene is the material itself. A common misconception among beginners is that any cardstock will suffice. In reality, the weight and texture of the paper dictate how well the layers stand up and how the light interacts with the cutouts. If the paper is too thin, the layers may warp under the tension of adhesives or fail to cast the deep shadows necessary for the 3D effect. If it is too thick, intricate details in the angels' wings or the stable's roof may tear during the weeding process.
For a project of this nature, consistency is key. High-quality results are often achieved using materials like Encore Cardstock 80 lb cover 216 gsm. This weight provides enough rigidity to hold the shape of an 8-layer design without buckling, yet it remains pliable enough for detailed cutting. Using mismatched weights across your eight layers can cause the entire composition to lean or collapse within the shadow box. Before purchasing, verify that your chosen paper is acid-free to prevent yellowing over time, ensuring your nativity belief display remains pristine for years.
Assembly Errors That Flatten Your Design
Once the cutting is complete, the assembly phase begins. This is where many projects lose their "pop." The magic of a Nativity Scene 3D Layered Paper Cut relies on the spacing between layers. A frequent error is using standard white glue or insufficient adhesive dots, which compresses the layers together. When the paper touches, the shadow disappears, and the piece looks like a single, confusing illustration rather than a dimensional scene.
To maintain the integrity of the 20.32×20.32 cm design, utilize foam tape or specialized 3D adhesive squares between each layer. These spacers create the necessary void for light to travel and cast shadows, highlighting the separation between the foreground figures and the background stars. Additionally, alignment is crucial. Without a steady hand or a jig, layers can shift slightly, causing the baby Jesus or the wise men to appear off-center. Take your time to dry-fit the layers before applying permanent adhesive. Building your cut into a shadow box or a lightbox requires precision; a misaligned layer can disrupt the entire visual flow.
Lighting and Presentation Considerations
The environment in which you display your creation matters just as much as the construction. Many crafters build stunning pieces only to place them in dark corners where the layering goes unnoticed. Since these designs are lightweight and take up minimal space, they are perfect for illuminated displays. However, introducing light sources introduces color temperature variables. As noted in product previews, actual final product colors may slightly vary due to lighting sources and the paper color. Warm LED lights can enhance the golden hues of the hay and skin tones, while cool daylight bulbs might make the scene feel sterile.
When constructing your shadow box, consider leaving the back open or using a translucent backing if you intend to backlight the scene. This turns the paper cut into a glowing lantern effect, emphasizing the spiritual significance of the angels and the holy family. If you prefer front lighting, ensure the angle grazes the surface of the paper to maximize shadow length. This technique brings out the texture of the cardstock and the depth of the eight distinct layers.
Making the Decision to Create or Buy
Finally, evaluate whether you want to cut the pieces yourself or purchase a pre-cut kit. Doing it yourself allows you to show your creative side by choosing custom paper colors that match your home decor perfectly. It involves several easy steps: choosing a design format, cutting it using a suitable machine, assembling with glue or 3D tapes, and putting the 3D design on a frame. However, this requires access to equipment and a willingness to troubleshoot mechanical issues.
If you lack the tools or time, purchasing a finished piece or a pre-cut kit ensures professional consistency. Regardless of the path you choose, the goal remains the same: making a lovely shadow box to highlight the nativity belief. Whether you are a small business owner looking to sell unique holiday decor, an educator teaching students about perspective and art, or a parent wanting to involve children in a meaningful tradition, the process offers immense value. Just remember to check the number of layers and size specifications beforehand to ensure it fits your intended frame.
By avoiding these common oversights regarding file types, material weights, adhesive choices, and lighting, you transform a simple craft project into a cherished heirloom. Your home will be radiant with it, serving as a gentle reminder of the season's true meaning. For those ready to start their journey with high-quality materials, you might explore options like the 12×12 Cardstock Shop to find the perfect foundation for your artwork. With careful planning and attention to detail, your layered paper nativity will stand as a testament to both your creativity and your faith.