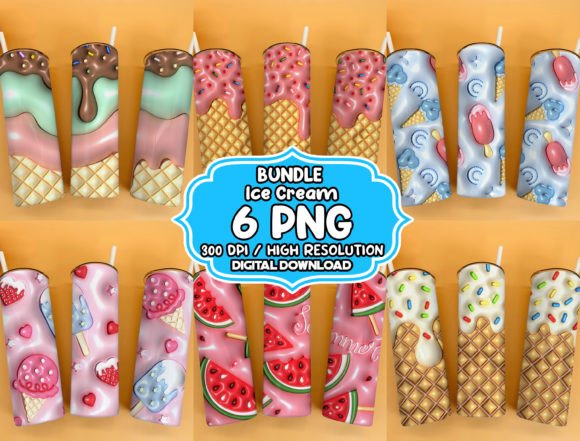
Mastering the 3D Inflated Ice Cream 20oz Tumbler Wrap for Professional Results
The trend of hyper-realistic, 3D-style graphics on drinkware has taken the custom tumbler market by storm, and nothing captures attention quite like a whimsical, inflated ice cream design. If you are looking to create a standout product for your small business, a unique gift, or a personal project, the 3D Inflated Ice Cream 20oz Tumbler Wrap offers a vibrant and playful aesthetic that appeals to a wide demographic. However, before you dive into printing and applying, it is crucial to understand exactly what you are purchasing and how to handle digital assets correctly to avoid wasted materials and frustration.
First and foremost, let's clarify the nature of this product to prevent any immediate misunderstandings. When you acquire these designs, you are purchasing digital files only. This is not a physical item, and nothing will be shipped to your doorstep. You will receive a zipped file containing high-resolution PNGs that you can download immediately after purchase. This instant access is a massive advantage for entrepreneurs who need to turn around orders quickly or hobbyists eager to start a weekend project. Inside that zip folder, you will find six distinct files: three featuring a straight shape and three with a tapered shape, all printed at a crisp 300 DPI with dimensions of 9.3″ x 8.2″. Understanding that this is a DIY digital kit shifts the responsibility of production to you, which is where many beginners stumble.
Avoiding the Physical Product Misconception
One of the most common pitfalls new creators face is expecting a pre-cut vinyl sticker or a finished tumbler in the mail. Because the listing emphasizes "digital designs," it is easy to skim over this detail when excited about the artwork. If you order these files expecting a physical wrap, you will be left without a product for your event or sale. The solution is simple but requires a shift in mindset: view this purchase as acquiring the blueprint, not the building.
To succeed, you must have the necessary tools ready before you buy. Ensure you have access to a printer capable of handling your chosen medium, whether that is printable vinyl, heat transfer paper, or waterslide decal paper. Without these supplies on hand, the high-quality PNG files sit useless on your hard drive. A better approach is to audit your crafting station first. If you do not own a printer suitable for vibrant color output, consider partnering with a local print shop that accepts customer files. This preparation ensures that the moment you download that zip file, you are ready to produce.
Selecting the Right Shape for Your Blank
Another frequent error involves mismatching the file shape with the tumbler blank. The package includes both straight and tapered options, yet users often grab the first file they see without measuring their specific cup. Applying a straight wrap to a tapered tumbler (or vice versa) results in unsightly gaps, overlapping edges, or distorted graphics that ruin the 3D illusion of the ice cream. The "inflated" look relies on perfect curvature; if the wrap does not fit the contour of the cup, the ice cream scoop may look squashed or stretched.
Always measure your tumbler blank before opening your design software. Most 20oz tumblers are fairly standard, but manufacturing variances exist between brands. Use the straight files for cylindrical cups that maintain the same diameter from top to bottom. Reserve the tapered files for cups that narrow slightly toward the base. Taking five minutes to measure and select the correct file saves you from peeling off a ruined application and wasting expensive sublimation paper or vinyl. Remember, precision is the difference between a amateur-looking craft and a professional-grade product.
Maximizing Material Versatility
These files are incredibly versatile, compatible with printable vinyl, heat transfer paper, and waterslides. However, a common mistake is assuming one printing method works best for every scenario without testing. For instance, using standard inkjet printable vinyl on a tumbler intended for hot beverages without a proper epoxy or resin coating can lead to peeling and fading. Conversely, using sublimation on a non-polyester coated cup will result in a dull, gray image rather than the vibrant colors shown in the preview.
To avoid poor durability, match your material to the end-use of the tumbler. If the cup is for cold drinks only, high-quality printable vinyl with a clear laminate overlay might suffice. For dishwasher-safe durability and heat resistance, sublimation on a coated blank is superior. If you are aiming for a seamless, "painted-on" look, waterslide decals are an excellent choice, though they require a learning curve regarding sealing and curing. Do not limit yourself to just one method; experiment with samples to see which finish best enhances the 3D depth of the ice cream graphic.
Resolution and Scaling Errors
While these files are provided at a high resolution of 300 DPI, issues arise when users inadvertently resize them incorrectly in their editing software. Stretching the image to fit a slightly different cup size can drop the effective resolution, causing pixelation that destroys the smooth gradients of the 3D ice cream effect. The print size is optimized for 9.3″ x 8.2″, and deviating significantly from this can compromise quality.
When preparing your file, ensure your software is set to "actual size" or 100% scale during the print setup. Avoid dragging the corners of the image manually unless you are holding the shift key to maintain aspect ratio. If you need to adjust the height slightly to accommodate a specific lid rim or base, do so proportionally. The clarity of the textural details in the ice cream and the cone depends entirely on maintaining that 300 DPI integrity. A blurry print looks cheap and undermines the premium feel of the design.
Final Checks Before You Print
Before you send your job to the printer, perform a final review. Check that you have unzipped the folder correctly and that all six files are present and readable. Verify that your printer settings are configured for the highest quality photo print mode to capture the full color spectrum of the design. Additionally, consider the background of your tumbler blank; these designs typically assume a white or light background for true color representation unless the PNG includes a transparent background specifically for dark cups.
By treating these digital assets with the care they deserve and understanding the nuances of application, you can create stunning, eye-catching tumblers that stand out in a crowded market. The 3D Inflated Ice Cream 20oz Tumbler Wrap is a powerful tool for creativity, but its success lies in your preparation and attention to detail. Avoid the rush, double-check your shapes and materials, and you will be rewarded with a professional finish that delights customers and friends alike.