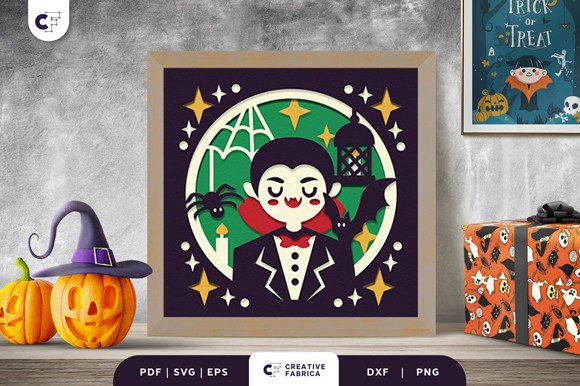
Cute Halloween Vampire Kid 3D Shadow Box Guide
Halloween decor often leans heavily into the terrifying, filling our porches and windows with gore and grimacing monsters. But there is a growing movement toward whimsy and charm during the spooky season, and nothing captures this shift quite like a Halloween Vampire Kid 3D Shadow Box. Instead of fearing the night, this project invites you to laugh at it. Featuring a cute vampire with silly expressions, funny poses, and quirky accessories, this design transforms the traditional bloodsucker into a delightful character posing in front of a haunted castle with flying bats. It is a perfect example of how paper crafting can bridge the gap between seasonal tradition and modern aesthetic preferences.
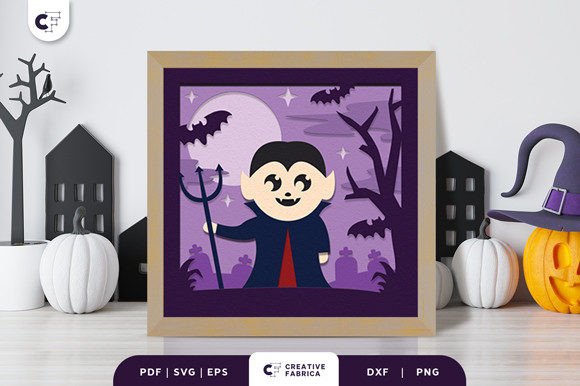
At its core, this project is a layered papercut assembly. The design's focal point is the adorable vampire, constructed through nine distinct layers of cardstock that create genuine depth and dimension when sealed in a frame. While the end result looks like a professional boutique item, the process is accessible enough for a weekend afternoon project. Whether you are looking to decorate your own home, create a unique gift, or produce items for a small craft business, understanding the nuances of this specific design can help you maximize its potential.
Why This Design Resonates Across Different Creators
The appeal of the Halloween Vampire Kid 3D Shadow Box varies significantly depending on who is holding the scissors—or the cutting machine. For a hobbyist just dipping their toes into the world of crafting, the primary draw is often the balance between complexity and achievability. With nine layers, the project offers enough intricacy to feel rewarding without becoming overwhelming. The instructions are straightforward: download the design, print on hard paper, cut, layer with glue, and seal. This clarity reduces the anxiety many beginners feel when starting a new technique like shadow boxing.
Conversely, for experienced professionals or seasoned crafters, the value lies in the customization potential. The design comes in versatile formats including SVG, PDF, EPS, PNG, and DXF. This variety ensures compatibility with everything from standard home printers to high-end industrial plotters. A professional might appreciate the ability to tweak the vector files (SVG, EPS, DXF) to adjust the scale or modify specific elements before cutting, allowing for a truly bespoke final product. The specified size of 20.32×20.32 cm fits standard square frames, making sourcing materials simple, yet the depth created by the layering gives it a premium feel that stands out in a crowded market of flat decorations.
Tailoring the Project to Your Goals
When evaluating whether this project fits your needs, consider what you hope to achieve. Different audiences prioritize different aspects of the crafting experience:
- Beginners and Hobbyists: Your priority is likely ease of use and learning value. This project serves as an excellent tutorial in understanding how light and shadow interact in paper art. By following the step-by-step layering process, you learn how to build depth logically. Using recommended materials like Encore Cardstock 80 lb cover (216 gsm) ensures the layers hold their shape without buckling, teaching you the importance of material selection.
- Small Business Owners and Entrepreneurs: For those selling handmade goods, commercial value and speed are crucial. The digital nature of the file means you can produce multiple units quickly once your workflow is established. The "cute" aesthetic appeals to a broad demographic, including parents looking for kid-friendly Halloween decor, potentially widening your customer base beyond horror enthusiasts. The ability to offer different color variations based on the paper stock you choose allows for a diverse inventory without needing new designs.
- Educators and Parents: If you are using this in a classroom or family setting, safety and engagement take precedence. The non-scary theme makes it appropriate for all ages. It can be a collaborative activity where younger children handle the coloring or gluing while older participants manage the precise cutting. It fosters fine motor skills and spatial reasoning in a fun, seasonal context.
- Interior Designers and Bloggers: Your focus might be on presentation and aesthetic flexibility. This shadow box acts as a statement piece that adds texture to a wall. Because the final color depends on the paper you select, you can match existing room palettes perfectly, from pastel goths to traditional orange and black schemes.
Material Matters: Achieving the Best Result
The quality of your final Halloween Vampire Kid 3D Shadow Box hinges largely on your material choices. The design is optimized for cardstock around 80 lb cover (216 gsm). This weight is substantial enough to maintain the rigid structure required for the 3D effect but thin enough to allow for clean cuts, especially in intricate areas like the bat wings or the vampire's facial features. Using paper that is too thin may result in sagging layers that ruin the illusion of depth, while paper that is too thick can make the assembly bulky and difficult to fit into a standard frame.
It is also important to note that lighting plays a significant role in how your shadow box is perceived. The interplay of shadows between the nine layers creates the visual magic. When placing your finished piece, consider where the light source will hit it. A well-lit corner or a spot with natural daylight can enhance the contrast between the foreground vampire and the background haunted castle, bringing the silly expressions and quirky accessories to life.
From Digital File to Physical Art
The journey from downloading the file to sealing the box is a satisfying process of transformation. Once you have selected your formats—perhaps SVG for your cutting machine and PDF for a test print—the real work begins. Precision is key during the cutting phase. Whether you are using a digital cutter or a craft knife, ensuring clean edges on all nine layers will make the gluing process much smoother. As you stack the layers, adding adhesive strategically to avoid visible blobs is essential for a polished look.
Remember that the images you see online are for preview purposes. The final product's color will vary based on your chosen paper and the lighting in your space. This variability is not a drawback but an opportunity. It allows you to imprint your personal style onto the project. You might choose deep purples and midnight blues for a mystical vibe, or bright neons for a pop-art twist. The framework is provided, but the creative execution is entirely yours.
Ultimately, the Halloween Vampire Kid 3D Shadow Box is more than just a decoration; it is a versatile tool for creativity. It challenges beginners to learn a new skill, offers professionals a reliable product for their catalog, and provides families with a fun, shared activity. By focusing on the amusing rather than the alarming, it reminds us that Halloween can be lighthearted and joyful. Whether you frame it for your mantle, gift it to a friend, or sell it at a local fair, this project delivers a high-impact visual result with a manageable investment of time and effort.
If you are ready to start creating, ensure you have the right supplies on hand. High-quality cardstock is fundamental to the structural integrity of the piece. You can explore options like 12×12 Cardstock Shop to find the perfect Encore Cardstock 80 lb cover to bring your vampire to life. With the right materials and a bit of patience, you will have a charming, spooky, and uniquely three-dimensional piece of art ready to greet your guests this October.